The following article includes the resources available to users regarding Education setup and selling in the Consortium.

Online registration form fields are managed through the LTR_TNEW_CUSTOM_FORM_DATA system table. Due to the backend process that runs to update the Education Screen with online registrations, the following should be considered when updating any of the form fields:
Field_name column should not be edited.
Option_value column can be changed but if done so, testing should be done to ensure the functionality is still operating properly.
Rows can be deleted if need be, however testing should be done to ensure the functionality is still operating properly.
Grades can be listed on the form as either "Grade K", "Grade 1", etc. or exactly as seen in the custom Education Registration screen, e.g. "Kindergarten", "1st Grade", etc. A combination of these options can be used as well, e.g. Kindergarten, 1st Grade.
A full listing of all possible registration fields with description is available in Tessitura under the LTX_TNEW_CUSTOM_FORM system table.
Registering a New Student
Find an existing constituent record or create a new record for the student's primary guardian.
If the primary guardian isn't already part of a household, create a household record and make the primary guardian the A1 affiliate.
On the household record, create a Child Member affiliate for the student. Make sure the child does not receive an A1/A2 affiliation
If the child's primary guardian is not their parent, create an association between the child's record and at least one of the adults on the household. (The system will create a Parent-Child association between the A1/A2 affiliates and the child if no other family association links the child to the household.)
If you know the child's birthday, navigate to the Attributes tab on their record and add a Birthdate attribute with the appropriate value.
On the Relationships tab, add a Student affiliation to the child's school. This can be a hard or soft affiliation.
On the child's record, click on the Custom Tab and navigate to the "Edu Registration" radio button.

NOTE: You must access the child's record by closing out of the household, searching (you can select "Last") and opening the child's record from the Constituent Search screen.
If working in an order, follow steps 1-6
Save and go back to order screen to complete the transaction.
Select "Done" in the order.
Open child's record from Constituent Search screen.
Proceed with Step 7-12
Click the "Add" button at the bottom of the screen.
Enter your organization and then save your work. (File->Save) If the constituent has a Birthdate attribute, the age and birthdate fields will populate automatically. If the constituent has a Student Grade attribute, the current grade field will populate automatically.
Enter general information in the form.
Select the primary guardian's contact information by choosing values from the dropdowns. If no values are showing, put a checkmark in the "Show Dropdowns" checkbox to reload the dropdowns. Also, make sure that the information is stored in the appropriate place on the constituent record. For example, if no phone numbers show in the Home Phone dropdown, go to the Contacts tab on the household record and save a control-grouped home phone number. The same is true for School- by following step 6 above, it will then show the School in the dropdown.
Save your work.
You're all done! You have successfully registered a new student!
Registering an Existing Student
Find the existing constituent record for the student.
Click on the Custom Tab and navigate to the "Edu Registration" radio button.
If a registration already exists that you would like to use:
Select the existing registration for the student for the current school year.
Update the student's information as needed. If you need to change contact information populated by dropdowns, put a checkmark in the "Show Dropdowns" checkbox to reload the dropdowns. If you change the liability form date, any future sessions belonging to the student will reflect that new date.
If you would like to create a new registration:
Click the "Add" button at the bottom of the screen and follow steps 9-10 above for registering new students.
Save your work.
You're all done!
Recording Attendance
Please see
this KB article for information on all attendance recording functionality.
Reports
Found in the Reports module in the Education folder, there are two custom reports to help track information on your education classes.
This report shows registration information for all students in the given session, and mimics the Education Registration screen.
This report shows payment and other registration status information for all students in the given session. It is designed as a quick way to get a class's roster and determine if there are any outstanding balances.
This report shows issues on education registrations and sessions for the given season, including:
- Class purchases not tied to a registration
- Registrations not tied to a class
- Students with dummy birthdate information. (If no birthdate is specified for a Child Member on the household, the system assigns them a dummy birthdate of January 1, [current year]-5 to make them 5 years old.
- Students whose Birthdate attribute does not match the birthdate on the registration
- Students whose Student Grade attribute does not match the grade on the registration
- Students with multiple active registrations with different information
- Students with registrations missing specific data
Your organization should schedule this report to run on a regular basis.
Background Processes
When a new student is registered, a background process will immediately do the following:
- Create a salutation for student with the "Education" salutation type.
A background process, running approximately every 30 minutes, does the following:
- Links sub-lineitems for the student to their Edu Sessions screen, which in turn reflects the cost, amount paid, and enrollment and attendance status for each sub-lineitem based on the constituent's corresponding order.
- Inactivates registrations last updated more than a year ago that are not tied to a class.
A nightly process does the following:
- Creates "Education" salutations for any students without that salutation type.
A background process, run only on June 1, does the following:
- Advances each student to the next grade level, for grades Pre-K through 12 only.
- Updates school years listed on custom forms, reports, Student Grade attribute, and TNEW screens.
TNEW screens are only updated if the "Class_Grade" field displays the schoolyear in this format: "2###-2###", e.g. 2018-2019
Education Registration Hub
The Education Registration Online Hub allows patrons to create new and alter existing education registrations online. Registration forms are built from the TNEW auxiliary forms tables and can be used in conjunction with or in addition to the auxiliary form functionality on performances offered by TNEW. That is, registrations using custom TNEW forms can be filled out during the cart process and/or through the hub, depending on your organization's preference.
Setup
Initial Setup

This section need only be done once for your organization.
- On the TNEW Admin page:
- Navigate to Site Setup->Customization Management and put checkmarks in the following boxes if not already filled in:
- Enable Local Procedure Access Control List
- lp_build_reg_hub_form
- lp_build_reg_form
- lp_process_reg_submit
- Click "Save".
This section needs to be done for each performance using the hub.
- In Tessitura, navigate to the performance that should be displayed on the hub.
- Form selection:
- If the registration form should appear during the purchase, follow the standard TNEW auxiliary form setup, ensuring that a ticketing keyword in the "TN_Express_AUX" category is tied to the performance.
- If the registration form should only appear in the hub, add the "Registration Form" content item to the performance, and select the appropriate form.
- Add a "Registration Age Type" content item.
- This content item determines some behavior of the form in the hub as well as how the information is parsed later on. Forms with the "Child" age type will only show Child members of that household on new registration. Similarly, forms with the "Adult" age type will show the Adult members, and "Mixed" age type will show all household members.
- (Optional) Add the "Registration Hub Display End Date" content item.
- This content item determines when the hub should no longer display the registration. Any registration displayed in the hub can be edited, so it may be necessary to set this for older registrations or registrations that need to be locked after a certain date.
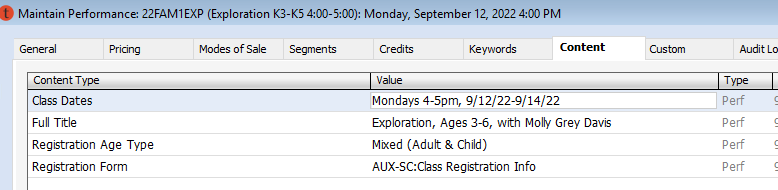
- (Optional) Add the "Full Title" content item.
- This content item is displayed under the "Sessions" heading in the hub. If this content item does not exist, then the description from the Performance screen in Ticketing Setup is shown.
- Please note: This content item is used directly in building the HTML form. Use <br> in place of new lines, otherwise the form may not behave properly.
- (Optional) Add the "Class Dates" content item.
- This content item is displayed under the "Dates" heading in the hub. If this content item does not exist for all of the performances in the patron's hub, the entire Dates column will not be displayed.
- Please note: This content item is used directly in building the HTML form. Use <br> in place of new lines, otherwise the form may not behave properly.
- (Optional) Add the "Email Template" content item. (See next step for creating a template.)
- This content item is used to send a patron a confirmation email after they make any changes to existing or new registrations via the hub. If the performance does not have this content item, then no email will be sent.
- In Ticketing Setup->HTML Templates, add or update an email confirmation to be sent to the patron after submitting any changes to existing or new registrations.
Any order confirmation HTML email template in Ticketing Setup can be used, but the "Edu Reg Confirmation" HTML template is intended as a starting point for sending out a notification related to registration updates. The "Edu Reg Confirmation" HTML template needs to be modified to reflect your organization's information before being used.
In TEST, the confirmation email is sent to the Consortium organization's power user, rather than the patron.
- In System Tables, navigate to LVRS_TNEW_CUSTOM_FORM_SAVE_DATA and ensure that the form being used has the CSI_Contact_Method set to "Online Class Registration".
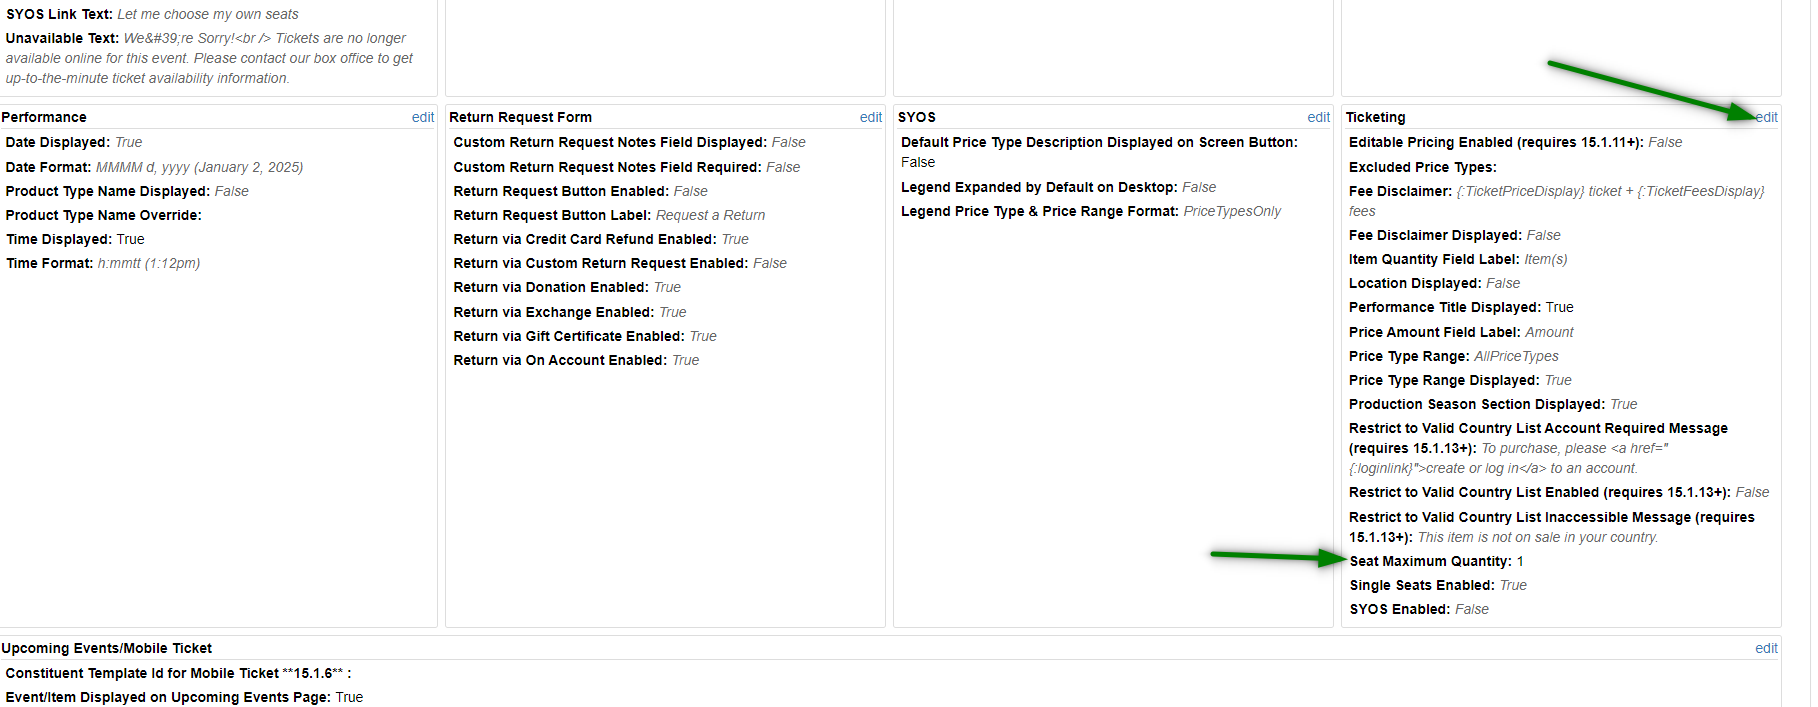
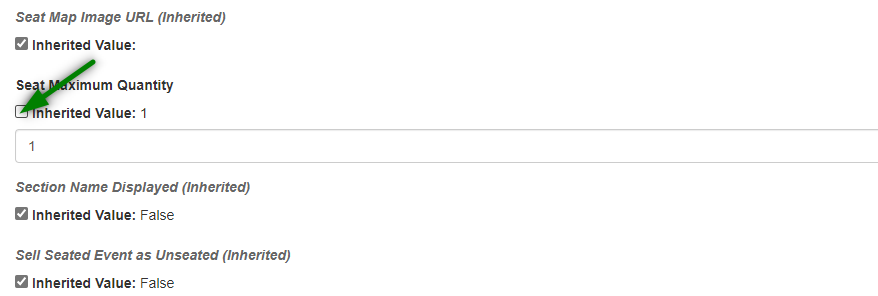
Seat Maximum Quantity
If using the hub in conjunction with the auxiliary form functionality on performances, the "Seat Maximum Quantity" must remain at "1" to ensure that each registration completed within the purchase path is tied to one education session.
If using the hub exclusively to replace the auxiliary form functionality on performances, the "Seat Maximum Quantity" setting no longer needs to be capped at "1". Patrons are able to purchase any number of sessions, checkout, and then register each student for those sessions at a later time via the hub. To update the "Seat Maximum Quantity" setting, complete the following:
- On the TNEW Admin page
- Navigate to Site Data->Product Type Editor
- In the "Performance Product Class" section, locate the product type(s) associated with any education offerings and click "edit" to expand:
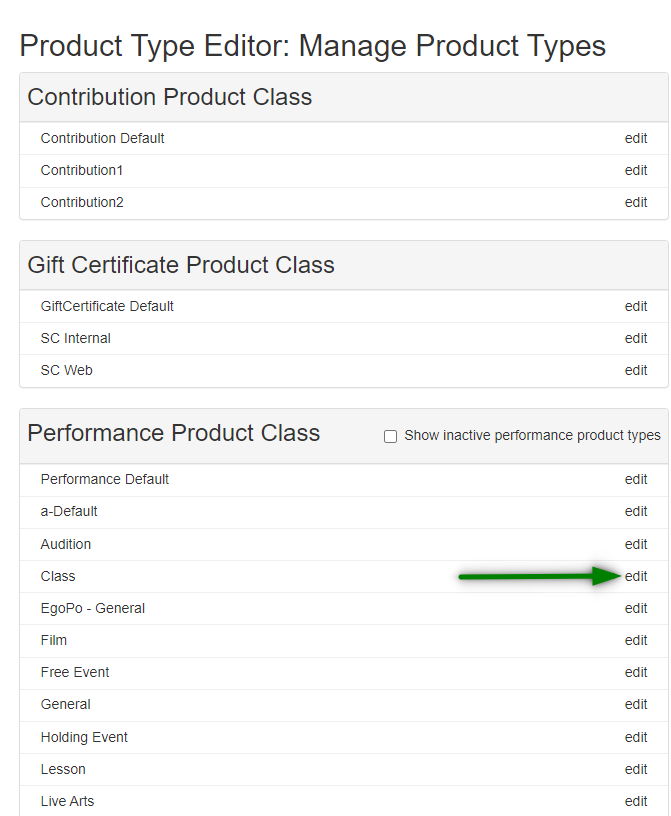
- Navigate to the "Ticketing" section within the product type and click "edit" to update the "Seat Maximum Quantity" setting:
If using the hub for certain performances and the auxiliary form functionality on other performances, the "Seat Maximum Quantity" can be overridden at the individual performance level via the Product Editor. To update the "Seat Maximum Quantity" setting on individual performances, complete the following:
- On the TNEW Admin page
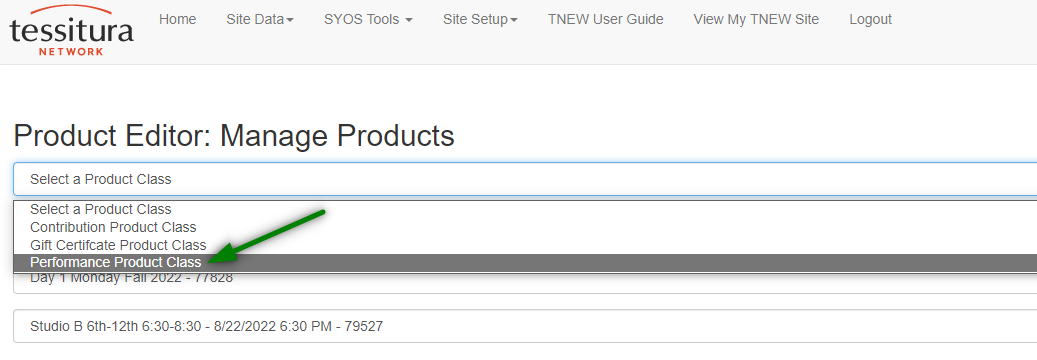
- Navigate to Site Data->Product Editor
- Select the "Performance Product Class" from the dropdown:
- Select the relevant production season from the production season dropdown
- Select the relevant performance from the performance dropdown
- Scroll down to locate the "Seat Maximum Quantity" setting and uncheck the "Inherited Value" checkbox and set the quantity to the desired number:
Use
Hub
The hub displays sub-lineitems tied to performances with linked auxiliary forms. A patron will have the following options:
BUTTON LABEL | CRITERIA | ACTION |
Pending Registration | ~For sub-lineitems linked to registrations edited or created through the hub that haven't been processed yet ~For sub-lineitems linked to an open CSI, i.e. not yet resolved and/or contains a failed action | None. Button is disabled. |
Edit Registration | For sub-lineitems linked to a registration (from the Custom tab->Edu Reg radio button) | When clicked, a new page shows the registration form with the fields pre-filled with the existing registration information. |
Register | For all other sub-lineitems | When clicked, a new page shows the registration form with blank fields as well as a household selector so that the patron can choose an existing member of their household for this registration or create a new household member.
When an existing member is chosen from the household selector, the form fields are automatically pre-filled with information from that patron's account, including the latest registration information, if available. |
Patrons can access the hub using the following link:
[TNEW BASE URL]/account/login?ReturnUrl=%2Fcomponents%2Fprecart%3Fexec%3Dtrue%26procedureId%3D288
(Replace [TNEW BASE URL] with your organization's TNEW URL, which can be found in LTR_GENERAL_CONSTS.)
This will bring patrons to the sign in screen and then, upon successful sign-in, redirect them automatically to the hub.
Sub-lineitem Criteria
The hub will display registration options for sub-lineitems that fit all of the following:
- Sub-lineitem must not have one of the following statuses:
- Return
- Void-Returned in this order
- Void-Returned in other order
- Return in Benevolent Mode
- Sub-lineitem must be on an order where the owner or initiator is the logged-in patron
- Sub-lineitem must be tied to a performance that either:
- Uses the standard TNEW auxiliary form setup with a ticketing keyword in the "TN_Express_AUX" category
- OR uses the "Registration Form" content item
- Sub-lineitem must be tied to a performance that has a "Registration Age Type
- The form linked in either the ticketing keyword or content item above must have the CSI_Contact_Method set to "Online Class Registration" in LVRS_TNEW_CUSTOM_FORM_SAVE_DATA
- Sub-lineitem must be tied to a performance in an active season
- If sub-lineitem is tied to a performance with a "Registration Hub Display End Date" content item, the value of that content item must be greater than or equal to the current date
If the patron has no registrations that fit the criteria above, they will see this screen:
Registration Screen & Processing
Once the patron clicks on a "Edit Registration" or "Register" button in the hub, a new page will display the registration form. See the table above for more information.
After the patron clicks "Submit" on the registration form, the responses will be saved to a backend table and then handled by the
custom education registration process. Existing registrations are updated to reflect the new submitted information. New registrations are created and linked to the sub-lineitem.
If the process encounters any issues with the responses, it will create a CSI with the response and the Consortium Organization's staff will need to fix the issue on the CSI in order for the registration to be processed. This is the same approach as when a registration entered through the standard TNEW auxiliary form has an issue.
Any registrations awaiting backend processing or having issues will be displayed in the hub with the "Pending" status. See the table above for more information.
Reporting
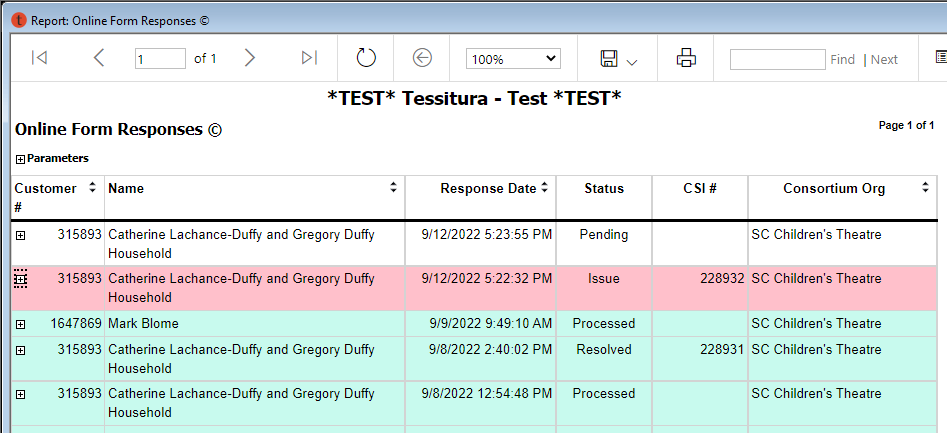
The OnlineFormResponse radio button on the Constituent Custom tab shows results from online custom forms saved through non pre-cart auxiliary forms for the patron.
Status can be one of the following:
- Pending
- Received from patron but not yet processed
- Issue
- Received from patron, attempted to process but encountered an issue. A CSI has been created and needs to be resolved.
- Resolved
- The CSI created from this issue has been successfully processed.
- Processed
- The response was processed successfully without any need to create a CSI.
Each response can be expanded to show the full response. Lines starting with asterisks (*) indicate that the patron entered different information in that field.
The Online Form Responses © report in the Web folder shows results from online custom forms saved through non pre-cart auxiliary forms. Can filter by list and response date range.
Troubleshooting Online Education Registration Customer Service Issues (CSIs)
TNEW allows the creation of Custom Forms which may be attached to certain performances, the results of which are then attached to a constituent's record as a CSI. In order to allow Education Registrations to occur online, PRAC has developed a customization wherein the contents of a CSI can be automatically parsed to the Education Custom Screen as new registrations. For more info on setting this up with your organization, please submit a support ticket.
Why Did the CSI Fail to Parse?
Unexpected or inconsistent data entered online may result in errors that keep the info in the CSI from being parsed into the Education Custom Screen. This will produce an action on the CSI of the action type "Auto Action Failed." Fortunately, they often require only a simple alteration to the record or CSI, and then the custom process can continue as normal.
Your registration form must include the following fields:
Class_First_Name
Class_Last_Name
Class_Parent_Best_Phone
If one of these fields is missing, the CSI will not be processed.
If your registration form includes fields that are marked as "Force Required" in LTX_TNEW_CUSTOM_FORM, then your form must have the "Is Required" checkbox filled in for that field in LVRS_TNEW_CUSTOM_FORM_DATA, otherwise the CSI will not be processed.
To see a list of all "Failed" CSIs for your organization, run the Customer Service Issue Tracking report with the following parameters:
Step A - Resolve CSI Errors:
Below are the common errors you are likely to see on an "Auto Action Failed" action. Double click the action to see these details.
"Automatic processing by LP_PROCESS_ONLINE_EDU_DATA failed: Parent name does not match any names on the customer record or HH principal records"
- Check out the constituent record. Does the parent name not match the one in the CSI? Which one is in error? Do you need to create a household for the record and affiliate the parent(s)?
- Attempt Step B
"Invalid source." This means that the options set up in the "Class_Marketing" field on LVRS_TNEW_CUSTOM_FORM_DATA don't match the "overwrite_desc" in LVRS_TNEW_CHECKOUT_SOURCE.
- Check these tables for typos or other reasons that the fields don't match.
- Update the tables so they match for any new registrations moving forward
- Update the failed CSI in the open text area with the new language that matches the Checkout Source system table.
- Attempt Step B.
Step B - Re-Attempt to Parse the CSI
The process is attempted automatically every 30 minutes between 9am and 9:30pm for open CSIs without an "Auto Action Failed" action. After resolving any errors by following the steps above, if you believe you have resolved the issue:
DELETE the "Auto Action Failed" action.
- SAVE and CLOSE the CSI. If it asks you to select a performance, please do so. It does not matter which performance you select.
- Within 30 minutes, a background procedure will attempt to parse the CSI again.
- If you have successfully resolved the issue, after 30 minutes you will see the new registration info populate onto the Education Custom Screen and the CSI will close with an action type of "Action Completed"
If you have not successfully resolved the issue, after 30 minutes you will see a new "Auto Action Failed" action on the CSI. Revisit Step A above and carefully look through the instructions. If you try again and have no luck, you may consider
submitting a ticket for assistance from the Support Team.
***Consortium organizations are highly encouraged to schedule the Customer Service Issue Tracking report to run on a regular basis so that these issues can be caught and dealt with as soon as possible.
There may be times where a CSI is not parsed within 30 minutes; if this occurs, wait another 30 minutes as the backend processing might be attempting to resolve conflicting info on multiple registrations for the constituent.
